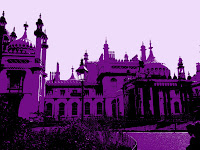
 Photoshop Three Colour Stencils: Using brighton picture in photoshop we duplicated the layers. With one layer we then had to go to "Image" ➔ "Adjustments" ➔ "Levels" to add so contrast into your picture once done then we duplicated that layer so we ended up with 3 layers. By hiding the top layer then going to the image that we just contrasted a bit we then "Image" ➔ "Adjustments" ➔ "Threshold" making it quite dark as it would used for the bottom layer so it needs to be of colour. Next we have to delete the white going to "Select" ➔ " Colour Range" then click onto the white sections which now makes the white become selected then by pressing deselect we were now able to see it a bit underneath. Then to change the colour by going to "Image" ➔ "Adjustments" ➔ "Hue and Saturation" ticking the colourise box and changing the colour to your liking. Then going back to the other layer at the top repeating "Image" ➔ "Adjustments" ➔ "Threshold" but this time making the threshold lighter then going to "Select" ➔ " Colour Range" then click onto the white sections which now makes the white become selected then by pressing deselect then make a new layer then put the new layer underneath both of the pictures that you have worked on and either fill the new layer with white or another colour so then you have your three colour stencil.
Materials: Photographs, Adobe Photoshop, Layers, Select 'Colour Range' Function, Hue/Saturation, Threshold Function, Delete Function.
Techniques: Creating a stencil style image using a photograph and Adobe Photoshop
Equipment: Mac Computer, Adobe Photoshop
No comments:
Post a Comment